(Updated 9 May 2004)
If your scanner doesn't have a negative scan function or if it isn't working properly, such as in the initial versions of NikonScan 3.1, here are some alternatives. (I assume, of course, your scanner produces adequate positive scans.)
The Problem:
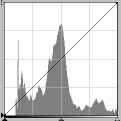
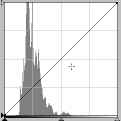
The exposure function for negatives in NikonScan for the LS-8000 has a bug that creates a gap 0 to 30, preventing the use of the entire tonal range, and sometimes results in scans that are difficult to adjust.
 |
 |
The Solution:
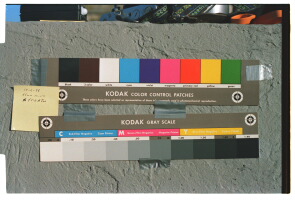
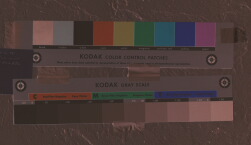
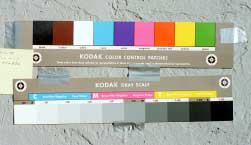
1. Generate preview as a positive:
 |
 |
2. Define an image crop area:
 |
 |
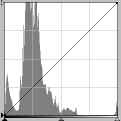
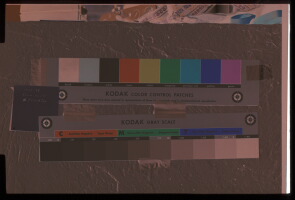
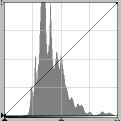
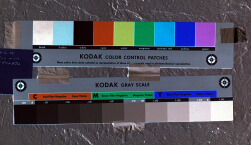
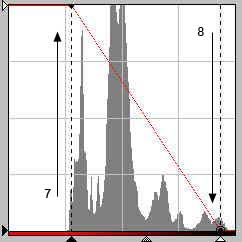
3. Adjust analog gain (+1.6 in this case) to force distribution over more of the tonal range:
 |
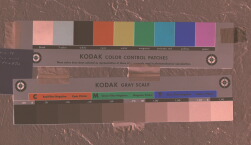 |
4. Generate a scan and save.
Proceed by selecting one of the three following methods:
![]()
5. Load the scan made in step 4.
6. Enter the menu command: Image, Adjust, Auto Levels
7. Enter the menu command: Image, Adjust, Invert
Pro: really fast and easy
Cons: requires Photoshop; individual b-w point adjustments not possible
Since this method is done in the same scan session, above, a copy of the positive (step 4) is unnecessary.
4. Open the curves drawer in NikonScan.
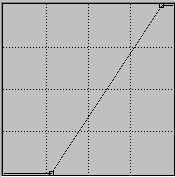
5. Press the auto levels button, ![]()
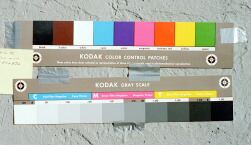
This sets the black-white points for each of the 3 color channels and eliminates the orange mask.
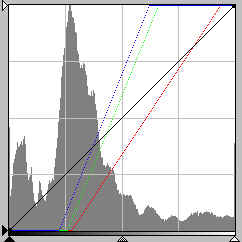 |
 |
6. Open the red channel.
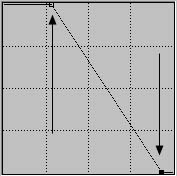
7. Grab the black anchor point and drag it to the top of the graph.
8. Grab the white point and drag it to the bottom of the graph. This inverts the red channel. Any necessary changes to the red curve may also be done here.
 |
 |
9. Open and invert the green and blue channels, by repeating steps 7 and 8, and modify curves if necessary.
10. Perform final scan.
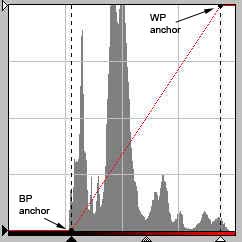
Note: An alternate to steps 6, 7, 8, and 9, if mere inversion is required, is to pull the black and white points of the RGB channel up and down, respectively, thus avoiding the task of having to open and modify the 3 individual channels. Don't forget to perform the autolevels (step 5) before doing this.
Pros: The main reason to recommend this method is that the user may achieve tonal and color balance prior to using the image editing program.
Notes: once a curve anchor point is grabbed, arrow keys may be used to nudge its position. NikonScan 3 permits steps 4 - 9 to be performed on the scanned image alternatively.
Cons: product specific; a bit tedious.
This method is essentially the same as method 2 except it is done in Photoshop.
5. Load the scan made in step 4.
6. Open the curves dialog (Ctrl-M).
7. Press the Auto button. This sets the black-white points for each of the 3 color channels and eliminates the orange mask.
8. Open the red channel.
9. Grab the black anchor point and drag it to the top of the graph.
10. Grab the white point and drag it to the bottom of the graph. This inverts the red channel.
 |
 |
11. Open and invert the green and blue channels in the same manner.
Note: An alternate to steps 8, 9, 10, and 11, if mere inversion is required, is to pull the black and white points of the rgb channel up and down, respectively, thus avoiding the task of having to open and modify the 3 individual channels.
Cons: requires Photoshop; doesn't display super-imposed histogram as NikonScan does; a bit tedious.
Note
All three methods assume an average gray color.
When I originally wrote this page I assumed that most readers would apply an RGB curve to adjust image gamma, but in response to several requests I generated a sample correction curve. After performing the above inversion, to set image gamma to approximate snapshot prints you may start with the following Photoshop curves file: InvCurve.zip. To apply: do Image, Adjustments, Curves, Load...InvCurve. Or you may specify an RGB curve with a single point at 27, 3.
The negative mode scan seems to have been fixed in NikonScan 4.0 with the LS-9000 but not with the LS-8000. If you have an LS-9000 and have an image that contains mainly shadow detail, I would still recommend this procedure because the negative mode procedure incorporates a step that darkens the image. You would of course omit this step.