 fig.
1
fig.
1
![]() Tonal scale
(prescan)
Tonal scale
(prescan)
![]() Tonal scale (b-w
pts. set)
Tonal scale (b-w
pts. set)
 fig.
2
fig.
2
![]() Tonal scale
(prescan)
Tonal scale
(prescan)
![]() Tonal scale (b-w
pts. set)
Tonal scale (b-w
pts. set)
Scanner Exposure--Getting It Right
If you're serious about your photography, there are probably few tasks that you perform as diligently and conscientiously as ensuring the correct exposure. Not only is it a matter of controlling the light, if possible, setting camera shutter speed, and lens aperture, but also selecting a film appropriate to the available light. Yet, having been so meticulous about exposing the original image how much thought do you give to your scanner's exposure? Or do you simply leave it to the scanner software to set automatically?
Setting the correct scanner exposure is one of the most critical steps in attaining a quality scan. Having said this, there may be nothing you can do to control exposure. The great majority of non-professional scanners use fixed-intensity fluorescent tubes. In addition, the majority of scanning software programs set CCD exposure programmatically. This means, unfortunately, most non-professional scanners have no provision at all for user control of exposure. The scanning program logic that sets exposure may sample the image's frame as the darkest density and then sample the lightest density found. This naïve determination of tonal scale may only accidentally coincide with the photographer's perception of the image's important tonalities. The consolation is that most automated exposure controls seem to perform adequately, especially for negative films. (Some third party scanner software programs do provide for user adjustment of CCD exposure.)
Nikon LS scanners use LEDs as a light source, the intensity of which can be controlled. This feature is called analog gain in NikonScan. NikonScan sets CCD exposure automatically or the user may retain the power-on setting; NikonScan does not otherwise allow CCD exposure to be adjusted manually.
What You're Trying to Do
Even if you work primarily with positive materials, problems with exposure may not be obvious on a monitor. A correct exposure is best attained by looking at the image's histogram. Lines along the margins, evidence of clipping, are immediate indicators of possible problems. By sampling tones in the image's main elements, the scanner user may determine that they are well distributed over the scanner's density range and not on the margins. Increased tonal definition in the subject at the cost of some clipping in non-important areas may be an acceptable trade-off.
The objective of setting scanner exposure -- as explained in the previous section -- is to maximize the complement (up to 256) of tones captured and to have as many of pixels valued away from the margins as possible. As with a camera -- after all, a scanner too is a camera -- the exposure of an image to be scanned is controlled by varying either the light or the exposure of the recording medium. By manipulating either or both the base of the histogram is stretched to span as much of the tonal space as possible. Setting scanner exposure is a pre-scan, analog operation so you want to achieve as full a range of tones here instead of the post-scan.
Adjusting Exposure through Analog Gain
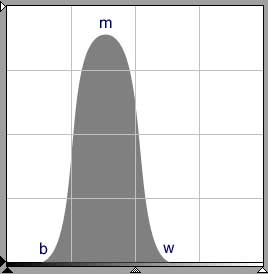
Adjusting the analog gain merely means changing the luminance of the scanner's light source. Usually this means an increase so that sufficient light can pass through denser tones for the sensors to measure. You can conceptualize the effect of increasing analog gain on the image histogram as follows (fig. 1):
Any pixel at point b is nearly black so increasing the luminance has little effect (little additional light passes through). Thus its value, or position on the graph, shifts slightly to the right.
The lightest tone, w, is lightened the most so its value and thus its position is shifted right the most. If it is to be a true white, analog gain is adjusted until it meets the right margin, as in fig. 2.
Tones in between (m) are shifted right proportionately. At the setting shown, the length of the image's tonal scale is maximized; any further increase in exposure will result in a diminished tonal scale as b is shifted right and w is shifted into the right margin.
| fig.
1
|
fig.
2
|
The tonal scales of the images are drawn under each histogram. Each scale has the same width as the base of its histogram and is proportionate to the number of unique tones. The advantage of setting exposure in the pre-scan is demonstrated by the longer length of the tonal scale after the black and white points have been set in fig. 2; it has many more tones than fig. 1.
Adjusting Exposure through CCD Exposure
If your scanner program has a feature to control CCD exposure, it operates in exactly the same manner as analog gain. That is increasing the exposure time has the same effect as increasing analog gain.
Using a Standard Exposure
Some scanners permit the user to disable autoexposure and use the current setting. This is useful if the user has a standard image to set the exposure for a set of images to be scanned.
The Tradeoff
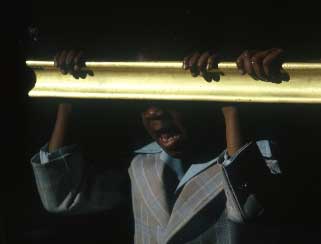
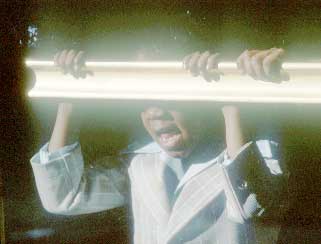
Of course, like any good thing, there's a cost to adjusting exposure of a CCD scanner. First, a new preview image and histogram must be generated to evaluate each adjustment. Second, brightening the LEDs has a tendency to aggravate CCD flare. The advantage of further brightening the LEDs must be continually weighed against losses of shadow and highlight detail. Flare is most noticeable as a halo in sharply contrasting areas such as in the bright rail against the dark background, below left. It can be more easily seen by adjusting the tonal scale, below right.
 |
 |
One very powerful feature of the Nikon LS scanners is that the analog gain of each of the color channels can be adjusted individually. This gives the user greater flexibility in setting tonal and color balance in the pre-scan step.
![]()