If you routinely use autoexposure, one guaranteed way of making for wasted effort is to mount the image carelessly and include a light leak.
As demonstrated in the previous page, autoexposure operates by adjusting the scanner's exposure until it maximizes the range of intensities that are achieved over the scanner's sensitivity range. It searches for the brightest area of the image and increases or decreases exposure until that area is close to the right edge of the histogram. Increasing exposure has the effect of moving the right edge of the histogram rightward; decreasing exposure has the effect of moving the right edge leftward. Though the crop box defines the boundaries of the image to be produced, NikonScan evaluates the full frame, not just the crop area. Therefore if the brightest area is outside the crop area, as it will be with negatives, the user may have to add exposure to obtain a full range of tones. Normally this is modest or zero. A light leak, however, confounds the exposure system with an area so bright that NikonScan thinks the image contains the most extreme dynamic range possible.
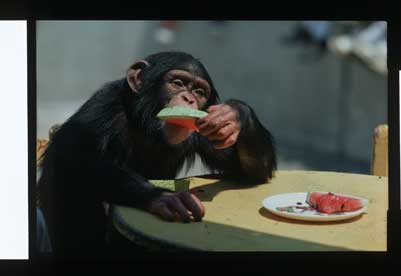 |
Fig. 2a Left, raw scan (without color corrections or points set) of a carelessly mounted transparency with a light leak. The light leak is so much brighter than any density in the image that the autoexposure determines that the dynamic range is much greater than it actually is. As a result the image is noticeably underexposed and has low contrast |
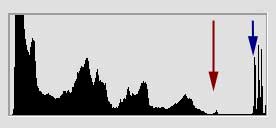 |
Fig. 2b RGB histogram. Compared with fig. 1b the light leak results in a constricted range. The red arrow indicates that the brightest highlights (mainly in the plate) have been misplaced. The blue arrow is the position of the brightest highlights in fig. 1b. The light leak is represented by the spikes (for the RGB channels) at the extreme right |
Effect of Light Leaks on Negatives (Low-Contrast Films)
Here is a negative scanned as a positive that has been properly masked:
 |
Fig. 3a Left, raw scan of a negative |
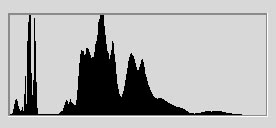 |
Fig. 3b RGB histogram for main subject of fig. 3. |
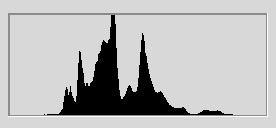 |
Fig. 3c Histogram for main subject of fig. 3 (yellow crop box). Range of intensities is typical for negative film -- less than transparency film. |
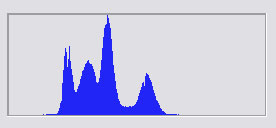 |
Fig. 3d Blue channel histogram (yellow crop box) |
The effect of a light leak on negatives is more serious than with transparencies:
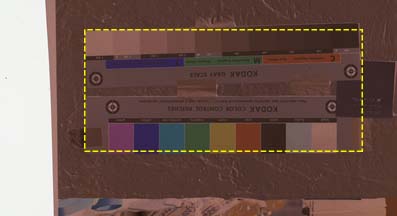 |
Fig. 4a Left, raw scan of negative with light leak not masked |
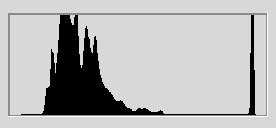 |
Fig. 4b Histogram for raw scan of negative with leak, fig. 4a |
 |
Fig. 4c Histogram for main subject of fig. 4a (yellow crop box) |
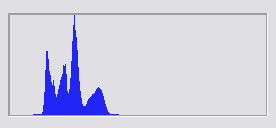 |
Fig. 4d Note the impoverished range of the blue channel as compared to fig. 3d |
An obvious question is why I didn't use NikonScan's color negative mode to demonstrate the effect of a light leak. The reason is that much of the negative mode's underlying functionality, which is shown deconstructed here, is hidden from the user. By performing an 8+ bit scan, NikonScan is able to return a histogram with a full-range of tones, the end-product that the user sees.