As with a camera, one of the critical functions a scanner must perform is setting its exposure. Because a scanner is a digital device, a measure that a proper exposure setting has been achieved is that the resultant number of intensities is maximized.
For NikonScan set an initial exposure through autoexposure; the user then has the option of using analog gain to override or modify the initial settings. NikonScan's autoexposure operates by evaluating the entire frame. The crop setting has no effect on the exposure.
What Autoexposure Accomplishes
The function of autoexposure is to match the dynamic range of the image with the sensitivity of the scanner. If done properly, this results in a full representation of intensities in the scanned image.
A Properly Exposed Image
For example, assuming an image containing a full range of tones, the histogram for a properly exposed image might appear as follows:
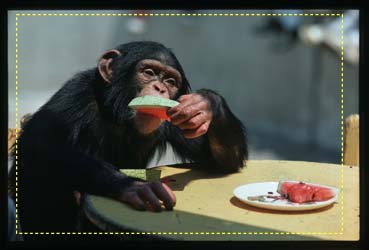 |
Fig. 1a, Left, raw scan (without color corrections or points set) of a transparency using autoexposure |
The full frame histogram is important because that's what the autoexposure interprets and bases the exposure setting:
 |
Fig. 1b, RGB histogram. The autoexposure function interprets the entire frame. An indication that autoexposure has functioned properly is that the full range of intensities results, spanning the width of the histogram and without clipped tones (bars along the left or right margins) |
A demonstration that NikonScan calculates scanner exposure based on the entire frame
Within the full-frame, looking at the histogram for the intended image (yellow crop area), autoexposure has been successful because the range of tones has not been diminished:
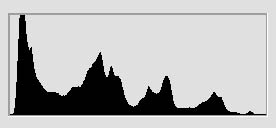 |
Fig. 1c, Crop area. This histogram shows that the image area includes the same range of tones as the full image except for the frame borders, which have been cropped out. If there are no extremes outside the crop area, basing the exposure on the full frame will also yield a good exposure for the image area |
Underexposure
Now suppose we've underexposed the above image. It might appear as:
 |
Fig. 1d, Left, raw scan of an underexposed transparency (without color corrections or points set) |
What results is a raw scan with approximately half the tones in 1a:
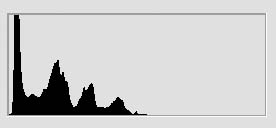 |
Fig. 1e, RGB histogram for entire frame of fig. 1d, underexposed. The tones at far left of histogram, although not adjacent to left margin, can be considered as clipped -- that is this image suffers for a loss of tonal definition in the shadows. This can be fixed by adding analog gain |
This is what the tonal scale in fig. 1b.
The histogram for the underexposed image is similar to the properly exposed image (fig. 1b), but compacted to the left.
The intended image (as defined by the crop box), a subset of the full-frame, therefore suffers a diminishment of the number of tones:
 |
Fig. 1f, RGB histogram for image area as defined by crop area, underexposed. This histogram confirms that the intended image suffers the same loss of tonal definition indicated in 1e. As the exposure is lessened, the image's tonal scale contracts. This translates into fewer and fewer tones (animation). |
Overexposure
On the other hand, suppose we've overexposed the above image. It might appear as:
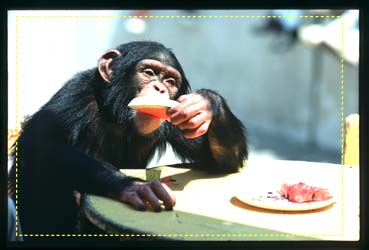 |
Fig. 1g, Left, raw scan of an overexposed transparency (without color corrections or points set) |
The histogram for the overexposed image is similar to the properly exposed image (fig. 1b), but shifted to the right with pixels shifted up against the right margin:
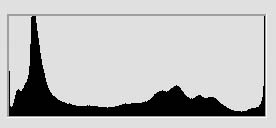 |
Fig. 1h, RGB histogram for entire frame of fig. 1g, overexposed. This can be fixed by subtracting analog gain |
What results is a raw scan with approximately as many tones as 1a, however, the line line along the right margin indicates a loss of highlight definition (some of the highlight tones in the frame have been clipped). Unfortunately this loss of definition in the highlights has occurred in the intended image (defined by the crop box), as confirmed by the presence of the histogram bar along the right margin:
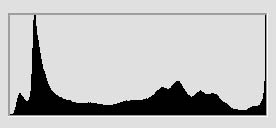 |
Fig. 1i, RGB histogram for image frame of fig. 1g, overexposed |
This is visually evident in the washed-out areas in the table and background.
 |
Fig. 1j, increasing exposure shifts tonal scale to the right |
If You Want a Full Range of Tones Why Not Perform 8+Bit Scans?
The reason for taking care in setting exposure is that we want to maximize tonal definition in our image. (Remember this is the digital world, and images have a discrete number of tones.) This is accomplished by matching the scan to the sensitivity of the scanner. If we underexpose the scan, as in fig. 1e, the result will be like fig. 1k,
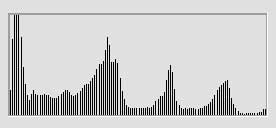 |
Fig. 1k, histogram for image frame of fig. 1e, underexposed, showing missing tones after black-white points set. Setting the black-white points is a simple linear expansion of the domain of fig. 1e |
which results in many missing tones after the black-white points are set. Overexposure, on the other hand, results in tones lost through clipping (shifted into white, fig. 1i).
A seemingly obvious alternative of obtaining a full range of tones would be to rely on the scanner's extra bits. Nowadays, even the cheapest scanners claim extra-bit precision (10-, 12-, 14-, or even 16-bits). The interval covered by a histogram contains 256 values (0 - 255). If you have a 12-bit scanner, for example, there are 15 values between each histogram value. It would seem, therefore, so that when the distribution of tones is expanded to set the black-white points, the in-between values fill any gaps. What your scanner vendor doesn't tell you, however, is how accurately and consistently it can measure the tones. The accuracy of most consumer scanners comes far short of being able to utilize their potential precision. Without multi-sampling, your 16-bit scanner may be giving you only about 7 accurate bits; the rest are garbage. The result will noisy shadow areas with little definition. The more bits your scanner offers in precision, the more accuracy is required of the scanner to use those bits. Extra bit precision is no substitute for proper exposure.